Lighting for Film & TV- Part 2- 3 Point Lighting
Click to Watch Video on Three Point Lighting Tutorial
“If you can light an orange so that it looks or photographs as smooth and round as a billiard ball, you are ready to light close-ups and portraits of living people.“
– John Alton, Cinematographer.
So… Lighting: It’s a huge subject, but I thought I’d attack the very basics in part 2 of this series – 3 point lighting. If you haven’t read the intro to this series you can find it here.
3 Point Lighting is a common technique that can be used for both documentary AND drama. It’s the foundation of most lighting techniques and is relatively quick and easy to setup. Please keep in mind that although I make a lot of references to lighting interviews here, these techniques are perfectly transferable to lighting your lead actors in a film, musicians in a music video or productsin a commercial.
I’m going to keep this one quick, snappy and concise. So let’s get to it!…
 I’ve lost count of the amount of times I’ve seen badly lit interviews on TV and non broadcast video productions. Unattractive nose shadows, dark eye sockets and multiple chin shadows leave poor interviewees looking extremely unattractive. Remember, when someone agrees to appear on camera they put their trust in you and consequently it’s part of your duty as a professional camera operator to make them look their best.
The reality is that lighting someone for an interview is actually very straight forward.
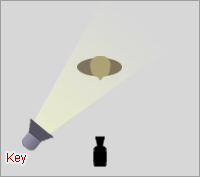
It’s called 3 point lighting… because we are going to use 3 light sources(Mmmm sorry to state the obvious!) These lights are called the Key Light, Fill Light and Back Light…
The Key Light.
This is the main, strongest light source. It is positioned on either side of the camera and its purpose is to create modeling on the subjects face.


For an interview setup, the subject should be facing the key…
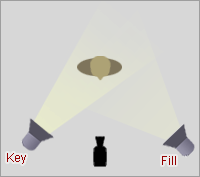
The Fill Light
This is positioned on the opposite side to the Key Light, personally I always position the Fill near the lens axis. The purpose of this lamp is to reduce (or Fill)any unsightly shadows created by the Key Light.
The Fill must be softer (less intense) than the Key (a general rule is a 3:1 ratio – 3 being the key intensity and 1 being the Fill). To make the Fill light softer, use a diffuser such as Spun or Scrim (this is white , heat proof translucent material specifically designed to reduced and soften a lamps intensity).


Remember, if you use fill, it should be very soft…

Can you see how we’ve lost some of the definite shape of the subject? That’s where the backlight comes in…
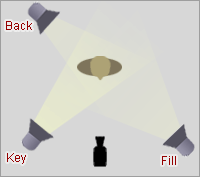
The Back Light
The back light is positioned behind the subject. The purpose of this lamp it to create highlights on the back of the head and provide subtle definition to the hair and shoulders. It separates (or as we say in the trade ‘Lifts’) the person off the background and helps make them appear more three-dimensional (though unfortunately nothing can help fix a flat personality!… sorry).
I prefer to use a ¾ back light which is directly opposite the key and highlights the shoulders but also favors one side of the subject more than the other.


The Backlight will just pick the subject off the background…
The Outcome:
So here’s the finished look, a nicely lit subject with all 3 lights…


Click the 2 images below for an animated breakdown… (getting fancy now, I know)


Got that? Good. Incidentally you don’t have to stick to 3 lights, you might want to drop the fill from time to time (sometimes it’s just not necessary), or even just opt for a very soft Key in a dark environment. There are all sorts of possibilities available, just have a play around. Like anything, the more you do, the better you will get.

Sometimes the Key and Backlight will do…

… or even just the Key light.
So there you have it, a short snappy post about how you can improve your lighting. If you want to get particularly good at portrait lighting, I’d recommend doing some research. Learn about chiaroscuro or buy a good book like “Painting with Light” by John Alton. It’s an incredible skill that takes years to master, but knowing how to light will really make your work stand out from the crowd.
I hope you’ve enjoyed this post, please be sure to share it with your mates – I want to try and get this info to the people who want it! Please show your support by following us on facebook and twitter (it’s free!!), and if you’re interested in receiving updates and future e-books then sign up in the email form to the right. Finally, I run Lighting and Camera Operators Courses so click the link or get in touch, if you’re interested in coming and learning in person!