
June
11
TriCaster Training Day
TriCaster Training Day- Students get ready Fall 2015!
Click for some Summer Video Watching on the TriCaster
Click for some more Summer Video Watching on the TriCaster


TriCaster Training Day- Students get ready Fall 2015!
Click for some Summer Video Watching on the TriCaster
Click for some more Summer Video Watching on the TriCaster
Double Exposure

For this project, you will combine two or more photos into a “Double Exposure” effect.
Double exposure is a popular darkroom technique where negatives were sandwiched together or a piece of photo paper was exposed twice. Some photographers even do double exposures in the camera by shooting an image and not advancing the film.
The result is a stunning and meaningful combination of two images.

Directions:
CLICK HERE to view a video tutorial on creating a double exposure in Photoshop.


![]()
NEW STUDIO TECHNOLOGY- TRICASTER 40, Control Surface, Virtual Set Editor, New Tripods and MORE!!!!!!!
STUDENTS- GET A EARLY START ON LEARNING TRICASTER 40
CLICK HERE FOR TRAINING VIDEOS


This assignment asks you to write a quote about photography. The quote can be you expressing your feelings about photography, or just about photography itself.
Using the quote and three or more photos taken by you, design a poster. You will use Layers in Photoshop to complete the project. A demonstration on how to use Layers will be given in class.
Be sure you spell check the words used in the quote.
See the example of the poster with photos and quote by legendary photojournalist Henri Cartier- Bresson.
Directions:
Open Photoshop, and select File New. You are creating a blank file to add your photos on to.

For a horizontal: Change the Width to 10 inches and Height to 8 inches
For a vertical: Change the Width to 8 inches and Height to 10 inches
Open Photoshop, and select File Open to open your photos.
Adjust the photos so you can see them on your monitor at the same time.
Select the Move Tool. (first tool on the tool bar)
Click on one of the photos and drag it onto the blank you created and release.
Do this for each photo.
Remember….keep your Layers window open to help manage your layers.
You can change the size of that photo by clicking on Edit> Transform>Scale. Now hold the Shift key down and mouse click on the corner of the image you want to change. Drag until desired size. Release the Shift key and double click inside image to hold the size.

To add your quote, select the Type Tool.
Click and drag on you photo to make a box and begin typing.
You can change the size and font with selections at the top of the Photoshop window.

To change the color, highlight the type and select the desired color using the Color Picker located at the bottom of the tool bar.
When finish flatted the image. Select Layer>Flatten Image.
Crop as desired.
When you are finished, save your photo on your desktop then print out and hand in.

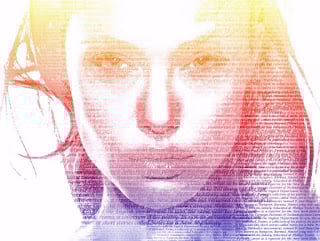
Create a Portrait Using Text
In this Photoshop tutorial, we’ll learn how to create a text portrait effect. In other words, we’ll create the illusion that the image seen in the photo is actually being created by multiple lines of type.
I’ve seen this effect used with many celebrity photos, from Andy Warhol and Marilyn Monroe to Michael Jackson, David Beckham, even Barack Obama. Of course, you don’t need a photo of someone famous to create this effect.
In fact, the more you know about the person in the photo, the more interesting the effect can become because you can add more personalized text.
You may want to write about what the person in the photo means to you, or share a funny story, or describe something they’ve accomplished. Or, you can just grab some random text from somewhere and paste it in.
CLICK HERE to view a step-by-step tutorial.Phot


Photoshop Project: Creating a 9 Square Grid

For this assignment you will select a “Theme” for your photos, then using your photos create a 9 Square Grid in Photoshop to display them.
Directions:
First select the “Theme” for your photos. Your theme should be a collection of 9 photos that are related in some way. They could be location, color, leading lines, or pattern. The nine photos you use in your project must have some commonality.
Using Photoshop, crop each photo 3 inches X 3 inches @ 300 dpi.
Once photos are cropped, create the document for your grid.
In Photoshop click on File > New.
Name your document. Then size the document.
Width: 9 inches
Height: 9 inches
Resolution: 300 inches/pixels
Click OK.
Turn on the rulers function. Click View > Rulers
You now will be working in Layers. Bring each of the 9 photos into the document and arrange in grid making sure each photo is the same size and shape.
Look at the ruler along the edges of your document to be sure you’re sizing the photos to the correct dimensions.
When you’re finished, flatter layers and save as a .jpeg. Be sure to name your file with your name so I know its your project. ¥ou can print out and hand to me, or email the .jpeg file to me at pschoener@wbactc.org.

A Plan for the Future: Making a Budget
Cash. Moola. Cha-Ching. No matter what we call it, we all make, spend and save money. While you may recognize the concepts of working, earning and spending; trying to understand variable expenses, cash flow and net income can feel like learning a foreign language.
This lesson breaks down key terms in budgeting, has you analyze sample budgets and introduces you to the process of creating your own plans for spending and saving.
Question to the class: What are your financial goals?
Buy a car?
Buy a laptop?
Plan to pay for college?
Earn a certain amount of money by a certain age…Millionaire by age 30?
How will achieve your goals? What’s your plan?
This plan is called your BUDGET!
Money coming in…money going out….Cash Flow
You work to get money…Money coming in. You buy something…money going out
Everyone….On a sheet of paper write down what you have spent money in the past two days. Have you bought any food, clothing or electronics? Have they gone to the movies with a friend?
Let’s share….
There are several different types of expenses:
Fixed expenses: Same each month, such as a rent, phone or car.
Variable expenses: Change in price and frequency each month, like food or gas.
Label your expenses.
As you become more independent, more expenses will become fixed.
Understand that knowing how money fits into these categories will help build an accurate budget.
Question:
Have you earned any money this month? (e.g., birthday cash, paycheck or allowance).
How do they keep track of what they make and what they spend?
Just like we need to track our outgoing expenses, we also need to track our incoming earnings.
Its called: Cash Flow
Know your Cash Flow! It allows us determine and monitor our budget.
Gross Income and Net Income
When you have a job, you earn what is called a gross income. This is the total amount of money you earn before taxes.
State, federal and social security taxes are all deducted from your gross income. Once taxes are deducted from your gross pay, you are left with what is called Net Pay.
Net Pay: The actual amount of money you take home and the number you start with when building a budget.
Hand Out: Budget Buster: Who’s Breaking the Bank
Assess which budget is the most successful in meeting the budgeter’s goals.
What adjustments could be made to meet the goal sooner?
Let’s Share….

Now create your own budget….
Using the worksheet Budgets 101: How to get it Done, create your own budget.
After you finish creating your budget, watch the video on tips for creating a budget and answer the questions below.
CLICK HERE TO VIEW THE VIDEO
1. List examples of “need to have” expenses.
2. List examples of “like to have” expenses.
3. What percentage of an average household’s annual income is spent on necessary expenditures?
4. Why is it important to know your income when creating a budget?
5. Define “fixed expenses”. Give examples
6. Define “variable expenses”.
7. Why it is important to determine what expenditures are “really” important to you?
8. Why is it important to regularly review your budget?
9. Why is it important to keep track of your monthly expenses?

***Daily Assignment***
Read the article in Yankee magazine on photographer’s portfolios and answer the questions below in the comment section of this post.
CLICK HERE to read the article
Contemporary Photojournalists: James Nachtwey,

Using the link below and other sites on the internet, answer the following questions to learn more about contemporary photojournalist James Nachtwey.
CLICK HERE to view link about Nachtwey that will help you answer the questions and view his photo essays.
After answering the questions, view and experience the photo essays of photojournalist James Nachtwey.
After viewing his photo essays, select one of his photo essays and write a short paragraph on your expressing your feelings about the essay. Describe the essay and explain why or why not the essay is successful in telling a story and/or making change.
Photo Essays by James Nachtwey:
Afghanistan
AIDS
Deeds of War
Romania
Bosnia
South Africa
Famines
Kosovo
Industrial Pollution
Crime and Punishment
Pakistan
Heroin
Rwanda
India
Chechnya
Israel
Indonesia
9-11-01


